Invite, Edit, and Deactivate Coupa Users
Introduction
Coupa allows vendors to add an unlimited number of users to their accounts on the Coupa Supply Portal (CSP). To empower your team while minimizing unwanted activities, administrators have the ability to define specific permissions for each user. This article will guide you through the process of inviting a user, editing their credentials, and deactivating their account.
Inviting a New User
Getting Started
To get started, you’ll need to be logged into the Coupa Supplier Portal. Once logged in:
1. Click the Setup Tab.
2. Ensure the first option, Users, is selected on the left.
3. Click the Invite User button.

Enter the User’s Details and Set Permissions
Next, fill in your invitee’s details. While only the email address is required, it is good practice to enter the user’s first and last name as well. This will help BlackLine’s AP team direct questions to the correct users, getting you paid faster. Ideally, you should include the user’s:
6. First Name
7. Last Name
8. Email Address
9. Country or Region
10. Area or City Code
11. Phone number
12. Extension
Set Purpose
You can set the user’s Purpose (13). Options include Accounting, Diversity, Legal, Procurement, Risk, Sales, and Sourcing.
Set Permissions
Check or uncheck the boxes In the Permissions Section (14) to grant or deny permissions. For a full list of permission, with explanations, the Full List of Permissions at the bottom of this article.
When everything is set the way you would like, click the Send Invitation (15) button to send an invitation to the user.

Accepting the invitation
When an invitation is sent, the user will receive an email. To join the CSP, the user must accept the invitation by clicking the Join Coupa Supplier Portal (16) button.

After accepting the invitation, Coupa will send another email with a Verification Code (16). The user must make a note of this code and…
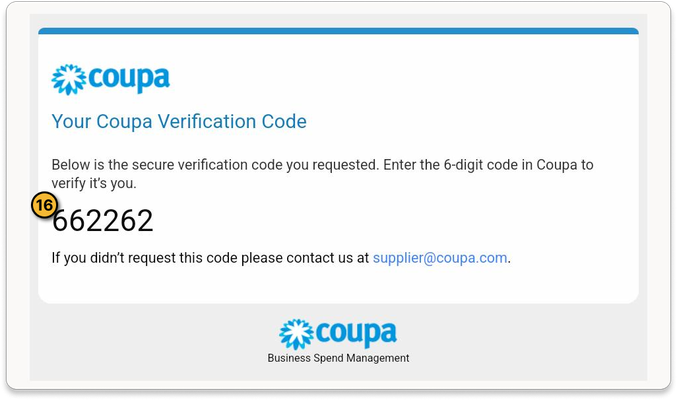
… enter it into the Verification (17) fields. If there are any issues with the code, a new one can be generated by clicking Request a New Code (18). When the code has been entered, click the Next (19) button.

When the user has accepted the invitation, they will appear in the User List (20).

Edit User
To edit a user’s permissions or other details, click Edit (21).

When permissions are updated and you are ready, click the Save (22) button to commit those changes.

Deactivate User
Should you need to remove a user’s access from Coupa, you can do so by deactivating their account. To do this, first, click the Edit (21) button.
Then, click the Deactivate User (23) Button.

If the user was successfully deactivated, you will see their Status (24) read as “Deactivated”.

Full List of Permissions
Permissions | Description |
|---|---|
All | Gives full access to all CSP functions, except for user administration. |
Admin | Has full access to all CSP functions, including user administration. Non-admin users can still view the Users tab of the Admin page and invite users, but they cannot edit existing users. The permissions on the invitation cannot exceed the permissions of the user creating the invitation. |
Orders | Allows viewing and managing purchase orders (POs) received from customers. |
Orders > | Allows accessing specific POs (assigned to specific users). |
Orders > | Allows viewing and managing all POs received from customers. |
All | Gives full access to all CSP functions, except for user administration. |
Invoices | Allows creating and sending invoices to customers. |
Catalogs | Allows creating and managing customer-specific electronic catalogs. |
Profiles | Allows modifying customer-specific profiles. Note: All users, regardless of permissions, can edit the public profile. |
ASNs | Allows creating and sending advance ship notices (ASNs) to customers. |
Service Sheets | Allows creating and submitting service/time sheets against POs. |
Service Sheets > Restricted Access to Service/Time Sheets | Allows accessing specific service/time sheets (assigned to specific users). The permission is off by default. |
Service Sheets > All | Allows creating and submitting any service/time sheets against POs. |
Payments | Allows viewing payments and downloading digital checks. |
Order Changes | Allows submitting PO change requests. |
Early Payments | Available only if your customers use Coupa Pay and enabled the feature related to this permission. |
Business Performance | Allows viewing business performance information, for example, order, invoice, and delivery trends. |
Sourcing | Allows viewing of sourcing events. |
Sourcing > Private and Public | Allows viewing of Private and Public sourcing events. |
Sourcing > Hidden, Private and Public | Allows viewing of Hidden, Private and Public sourcing events. |
Community | Available only for Coupa Advanced suppliers. Allows users to join the supplier community and collaborate with its members, learn and share best practices, as well as give feedback on future Coupa features. |
Order Line Confirmation | Allows users to confirm specific lines of PO. |
Forecast Planner | Available only if a buyer has Coupa Forecast Collaboration, part of Supply Chain Collaboration. With Coupa Forecast Collaboration, demand changes are shared in real-time, enabling buyers and suppliers to rebalance their supply chains and minimize unnecessary inventory, ultimately increasing service levels and profitability. |
Workers | Allows users to manage direct engagements with individual workers. |
Workers > View | Allows users to access a list of workers and view individual worker profiles. It is intended for users who need read-only access to basic worker information. |
Workers > Manage | Allows users to create, update, and export worker profiles, view sensitive information (such as national identifiers), and manage various cards on a worker’s profile. |
Worker Assignments | Assignments let you track workers, so you know who is working on what, as well as which workers are currently active and which are available, helping you allocate resources more efficiently. |
Worker Assignments > View | Allows users to view assignment details and access lists or grids of worker assignments. This includes viewing assignments associated with specific purchase order lines, allowing users to monitor assignments without editing rights. |
Worker Assignments > Manage | Allows users to create, update, confirm, and close assignments. It includes access to assignment history logs and the ability to reopen assignments. |